0%

说在前面

之所以写这篇文档是为了记录自己到底做了多少优化,目前我自己做的优化我已经快要麻木了。一般今天优化了我的生产环境之后,马上忙其他的事情去了,然后过了一个多星期回来再看,已经完全看不懂了。记录记录,一定要记录。就像代码一定要写注释一样。。。

Visual Studio Code

Remote SSH

首先当然是vscode的远程连接功能啦,不过我这是用来远程连接虚拟机的。但也不是远程,毕竟虚拟机就在我电脑上跑着,不过能在Windows下用vscode来操作虚拟机里的文件代码等当然是最香的啦

这个remote ssh 我是根据官网来实现的,具体怎样的我还真忘了。反正根据官网来准没错。并且这个在我本地磁盘上的虚拟机还表现为我在Windows上可以直接通过 ssh 我的 Username@MachineName 得到,不存在解析失败啥的。神奇,但我不懂。有关于 ssh 的我可能还需要专门开一篇文档来讲一讲记录一下我的电脑上的养蛊行为

总之我目前实现的功能是直接可以在 vscode 中点击打开远程连接,然后就会自动跳出我的虚拟机的名字 pezayo ,然后点击后就可以连接到我的虚拟机进行操作。

Git

现在我又使用vscode进行了 Git 的操作,好吧,比较简单,无脑下插件就行。然后只要我打开的文件夹已经git init过了有 .git 这个隐藏文件夹之后,就能自动识别到并通过可视化的方式方便我提交工作区的文件和目录。

GitHub

SSH Key

GitHub上使用 SSH 已经是非常普遍的了,人均如此,对着任何一个教程或者博客来一遍就会了,主要就是一个公钥的赋值粘贴罢了,然后用私钥来进行握手。

这样就可以实现本地仓库与 GitHub 远程仓库之间的连接了。

Action

GitHub上具有 Action 的功能,算是一个在线的资源平台,在上面你可以配置你想要的环境,运行你想要代码,相当于一个服务器在帮你托管运行东西,还不收你钱的。我目前也不会用这个,主要是 fork 了 @kotty 大佬的项目用来每天的自动打卡。

但是打卡脚本寄了。期待其他大佬的脚本的出炉,俺要叉(fork)!!

此博客 Hexo

插图

参见我的另一篇文档写了关于Hexo中插图的问题和现象。有点哪里都不太好的感觉。

封面/主题

暂时挑了一个外太空的背景图片当封面。真正的封面无法使用 next 实现,next 不支持封面的展示。butterfly 可以有,像我认识的其他一些大佬博客 比如 @ydjsir 的就是butterfly 主题可以支持封面。呜呜呜,这就比我的博客好看多了。摆烂摆烂(咱理不直气也壮)

Matlab

Live Script

这个实时脚本之前一直被我忽略的,现在看来还是挺香的,有着Jupyter Notebook 的感觉。支持碎片化的运行。还能在里面写Markdown ,巨香无比的感觉

另,其还支持导出,导出PDF, Latex等,不过这个导出不能算是实时脚本的功能。但能导出Latex还是蛮香的,起码代码可以直接白嫖过去,不用自己那么费手去写

Latex

latexmk

这个在我另一篇专门讲述 latex 小细节的地方有讲到,挺好的一个工具,这个并不是CTAN官方发明的,是别人投稿的,早已被收录。感谢作者,救我小命。

Qt Creator

ui

这个也不是什么新鲜东西,基本必备的一个存在,直接自己想加什么就拖上去就可以。不过假如你是大佬的话,可以去手搓 ui ,这样就不会有什么构造函数上的大坑了(不清楚初始化 ui 时其背后做了什么)毕竟我也曾有幸掉进了多线程的大坑中,在多线程中,一个进行赋值的对象,ui有没有初始化调用构造函数居然影响着程序的报错。

最后我的吊儿郎当的程序(C++写C代码)还是靠着 bug 挺过来了。

Microsoft Edge

设置

当然要把主页设置为高贵的bing啦(虽然我现在把新标签页默认搜索引擎设置为了Google)

另外新标签页使用了infinity插件进行管理,还挺好用的,虽然之前崩过几次,但现在一直没崩过了,体验不错。

扩展(extensions)

ublock origin

广告劫持阻拦,巨爽无比

油猴(TamperMonkey)

具有大量脚本,使用非常爽。脚本大概也类似于插件。有去广告,免翻页,白嫖VIP内容等

简阅(SimpleRead)

可以提取html页面中的核心的 markdown 部分的内容,然后除去其他所有元素,仅仅保留 markdown,阅读体验直接plus, 非常适用于某乎,某CSDN,某博客园。另外还可以自定义提取后的markdown的显示内容。方便,用起来体验绝佳。

快捷键一览

随着我使用的 IDE 增多,如CLion,Pycharm,Visual Studio Code (也许算个IDE, 说不定呢),Jupyter notebook,除此之外还有一些终端命令行工具啥的,其中需要用到许多快捷键,这些快捷键的使用能够大大提高我的效率。嘿嘿~

但是问题来了,有些快捷键我很难记得住,表现为,我不常用真的记不住,我有时候会高强度使用但过段时间没用忘了等等。虽然可以通过上网 CSDN 等一下子能查到,但每次都这样让我巨恼火。于是决定写个文档记录下来我可能会忘记的快捷键。像Ctrl C or V 这种就不用记录下来了。~~~毕竟用的。。。嘿嘿。

Visual Studio Code

  • 打开选项搜索栏: F1
  • 注释当前行(选中行): Ctrl + /
  • 查找: Ctrl + F ;查找后全部替换: Ctrl + Alt + Enter
  • 上下移动当前行(选中行): Alt + Enter
  • 打开终端: Ctrl + ` ; 新建终端: Ctrl + Shift `

Jupyter

运行当前节: shift + Enter

Pycharm

  • 替换(重命名): Ctrl + R ;全局替换:Ctrl + Alt + R
  • 查找: Ctrl + F ;全局查找: Ctrl + Alt + F
  • 打开设置: Ctrl + Alt + S (会与QQ截屏功能冲撞,且QQ优先级更高)

Qt Creator

  • 帮助: F1
  • 转到源(头)文件: F4

CLion

Visual Studio

1
2
3
4
5
ctrl + K C //注释
ctrl + K U //取消注释
ctrl + 鼠标点击 //转到函数定义,声明
F12 // 转到函数定义
F11 // 单步调试

Matlab

待续。。。

hexo 的图片插入问题

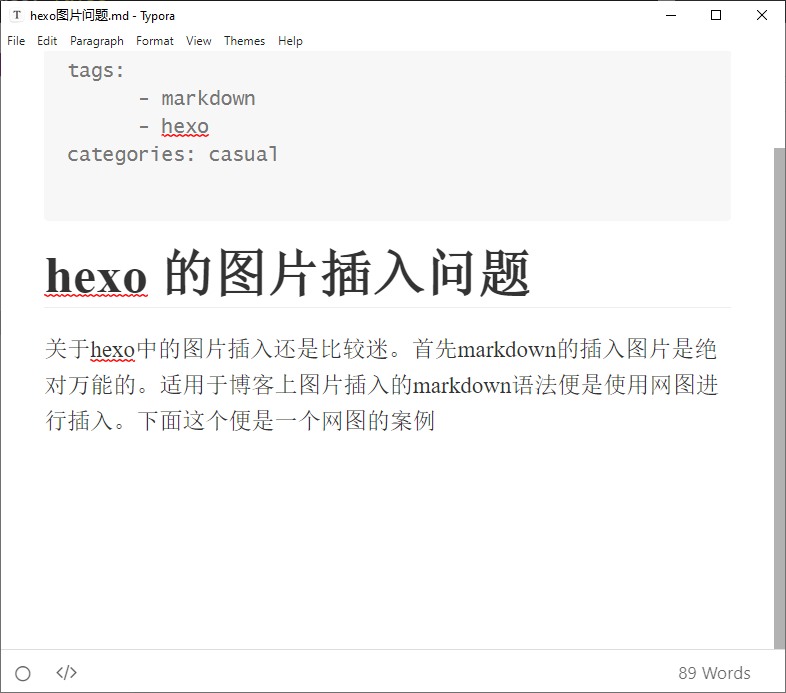
关于hexo中的图片插入还是比较迷。首先markdown的插入图片是绝对万能的。适用于博客上图片插入的markdown语法便是使用网图进行插入。下面这个便是一个网图的案例

这是smms图床的网图

好,除此之外,hexo还支持一些奇技淫巧的图片插入方法。其实也是我一直想要探究的如何将自己的图片托管的博客上,而不是在每次使用Typora插入图片自动使用图床上传生成一个随机url,使用博客进行 托管,那个url自然有规则一点,并且还可看出这张图片属于我。

关于这种图片的插入。目前发现的方法是使用hexo支持的标签语法。{% img /your-image.png the-description %}当然还有一些其他复杂的参数,比如高度宽度啥的,不过这都是次要的。其中那个图片前面的正斜杠是必要的。当然这一切都需要一个前提条件,就是你需要在hexo站点配置文件_config.yml中将post_asset_folder的选项设置为true。然后每次在git bash命令行中去hexo new article-name新建一个文件时,其又会自动新建一个同名文件夹。同名文件夹中的图片可被这篇markdown读取,目前测试的是使用这个hexo语法标签才能引用到。然后我发现到的是,每次这样,在提交完后,进入github的部署文件中,发现其中的html文件与图片其实在一起,都在那个文件夹下。以下就是这个图片的hexo语法展示结果,显然这张图片在博客中可以看到,但在本地markdown编辑器中无法显示,

仅仅为纯文本内容。

另外,我再去使用markdown语法去这个文件目录下进行引用看看行不行。

这是去同名文件夹引用

目前就是这样。网上还说可以在source目录下新建一个文件夹专门放图片,然后使用绝对路径去引用,但貌似不行。比如这样

这是普通的markdown语法

到底行不行,一目了然。

就我而言,我也不知道,我会倾向于哪个。显然,我在本地编辑的时候,我肯定不想让我的一张图变成一个语法标签。但我这个网图上传到smms图床生成一堆乱码式的url就让我看着不爽,不够优雅。而用另一个可以在博客中看到图片的url非常优雅。。。但这个图片实际上还是在本地,不过其实也托管到GitHub上了,也算是一个图床了。我GitHub上原本就已经托管 了一个图床,现在还可以在这里进行托管。

Changes in Ubuntu

改变terminal的颜色设置

终端优化

通过以上链接改变了prompts的字体颜色,由绿色改为蓝色,将PS1中的\u前的中括号内的32(绿色)改为34(蓝色)

image-20220408020417360

aptitude

2022年3月5日,12点04分

sudo apt install aptitude 下载安装了aptitude包管理工具

aptitude 相比apt拥有一个图形化界面,更加友好,且能直接显示已安装的包,未安装的包,待升级的包的数量。

vim themes

我突然想配置我的Vim的界面,于是我在下面链接找到教程

一篇文档

还有 ghr 学长的配置,链接为 github 参考自 MIT 的老师。

tmux

tmux 是一个多终端系统。可以比较方面的实现无鼠标多终端操作。此外 tmux 还适用于在服务器上运行,可避免服务器杀死本地远程连接长时间无操作的程序。

其相关配置仍参考 ghr 学长的配置。

sshd_config

修改sshd_config文件,修改后结果在下一页中

sshd_config

除此之外,还需要运行sudo service sshd restart 将ssh服务重新配置。

网络问题

虚拟机网络出现大问题,使用NAT,桥接,hostonly都出现问题。反应为使用以下命令没有用。都显示Unit networking.service not found. 以下命令全部没用。以下命令均为从英文网站中找到的命令,检索信息为***.service not found

1
2
3
4
5
systemctl restart networking
systemctl start NetworkManager
systemctl enable NetworkManager
service network restart
sudo service network-manager stop

除此之外,我还有去按照那些英文教程去改配置文件,表现为以下几个文件

1
2
3
sudo vim /etc/NetworkManager/NetworkManager.conf
sudo vim /etc/systemd/network/05-eth0.network
sudo vim /etc/network/interfaces

其中NetworkManager.conf中的内容为将false改为true,但我觉得是错误的做法。我后来又将其改了回来,即为保持这个文件默认不变。另外05-eth0.network文件原本不存在,我手动建立一个后填写东西后,显然我不会,我又将其删除。依然保持不变。

最终的解决办法是在CSDN上找到,准确来说应该不是CSDN,而是我换了一个检索关键字,直接搜索**网卡消失,**所以这个问题的解决办法还是在interfaces中去进行更改,加上eth33选项。因为最初的症状表现为使用ifconfig 只能看到本地回环的网卡选项,而使用ifconfig -a 能看到ens33选项,但是上面的ip地址不合理。在interface中加入ens33后,再在命令行输入以下命令重新分配ip

1
2
3
4
5
6
7
8
9
10
11
pzy111@pezayo:~$ sudo ifconfig ens33 up
pzy111@pezayo:~$ sudo dhclient ens33
pzy111@pezayo:~$ sudo ifconfig ens33
ens33: flags=4163<UP,BROADCAST,RUNNING,MULTICAST> mtu 1500
inet 192.168.8.128 netmask 255.255.255.0 broadcast 192.168.8.255
inet6 fe80::20c:29ff:feb4:6d14 prefixlen 64 scopeid 0x20<link>
ether 00:0c:29:b4:6d:14 txqueuelen 1000 (以太网)
RX packets 16 bytes 2177 (2.1 KB)
RX errors 0 dropped 0 overruns 0 frame 0
TX packets 67 bytes 8824 (8.8 KB)
TX errors 0 dropped 0 overruns 0 carrier 0 collisions 0

现在可以正常上网。

注:此处仅仅是瞎碰出来的,他确实不稳定。

系统启动时,网卡没有启动,每次网卡都没有自动获取到ip地址,都需要去进行手动的获取,使用sudo dhclient ens33 去获得ip地址。如果不行使用sudo ifconfig ens33 up 去启动网卡,把up改为down则为关闭网卡。

1
2
3
4
$ sudo lshw -C network     # 检查网络配置
$ sudo systemctl status systemd-networkd # 检查服务是否启动
$ sudo systemctl start systemd-networkd
$ sudo systemctl enable systemd-networkd

虚拟机中安装的CentOS8无法启动网卡使用网络_witton的博客-CSDN博客_centos8 unmanaged

关于Ubuntu的网络配置,网上一致的说法为有两个可以配置的

  1. systemd-networkd系统层面的,即命令行层面的,调用/etc/network/interfaces里的配置
  2. NetworkManager,需要额外的去下载的,但一般带有桌面的系统自带。

NetworkManager拥有更高的优先级,即他存在时,另一个将不工作。但是如果/etc/network/interfaces被改动了,则会被挤下去。此时需要去/etc/NetworkManager/NetworkManager.conf文件中去更改,将managed设置为true,即使他仍然可以接管。

另外关于我的虚拟机上出现的问题,表现为我的有线连接无法被识别,无法被托管。我最终在上面这个CSDN中找到解答。我输入nmcli 显示lo 和 ens33 均未托管。但是我在输入nmcli n显示enable,此时只需要输入nmcli n on 即可重启我的服务。有线连接立马出来,立竿见影!!

sshd_config

1
2
3
4
5
6
7
8
9
10
11
12
13
14
15
16
17
18
19
20
21
22
23
24
25
26
27
28
29
30
31
32
33
34
35
36
37
38
39
40
41
42
43
44
45
46
47
48
49
50
51
52
53
54
55
56
57
58
59
60
61
62
63
64
65
66
67
68
69
70
71
72
73
74
75
76
77
78
79
80
81
82
83
84
85
86
87
88
89
90
91
92
93
94
95
96
97
98
99
100
101
102
103
104
105
106
107
108
109
110
111
112
113
114
115
116
117
118
119
120
121
122
123
#	$OpenBSD: sshd_config,v 1.103 2018/04/09 20:41:22 tj Exp $

# This is the sshd server system-wide configuration file. See
# sshd_config(5) for more information.

# This sshd was compiled with PATH=/usr/bin:/bin:/usr/sbin:/sbin

# The strategy used for options in the default sshd_config shipped with
# OpenSSH is to specify options with their default value where
# possible, but leave them commented. Uncommented options override the
# default value.

Include /etc/ssh/sshd_config.d/*.conf

Port 22
#AddressFamily any
#ListenAddress 0.0.0.0
#ListenAddress ::

#HostKey /etc/ssh/ssh_host_rsa_key
#HostKey /etc/ssh/ssh_host_ecdsa_key
#HostKey /etc/ssh/ssh_host_ed25519_key

# Ciphers and keying
#RekeyLimit default none

# Logging
#SyslogFacility AUTH
#LogLevel INFO

# Authentication:

#LoginGraceTime 2m
PermitRootLogin yes
StrictModes yes
#MaxAuthTries 6
#MaxSessions 10

PubkeyAuthentication yes

# Expect .ssh/authorized_keys2 to be disregarded by default in future.
#AuthorizedKeysFile .ssh/authorized_keys .ssh/authorized_keys2

#AuthorizedPrincipalsFile none

#AuthorizedKeysCommand none
#AuthorizedKeysCommandUser nobody

# For this to work you will also need host keys in /etc/ssh/ssh_known_hosts
#HostbasedAuthentication no
# Change to yes if you don't trust ~/.ssh/known_hosts for
# HostbasedAuthentication
#IgnoreUserKnownHosts no
# Don't read the user's ~/.rhosts and ~/.shosts files
#IgnoreRhosts yes

# To disable tunneled clear text passwords, change to no here!
PasswordAuthentication yes
#PermitEmptyPasswords no

# Change to yes to enable challenge-response passwords (beware issues with
# some PAM modules and threads)
ChallengeResponseAuthentication no

# Kerberos options
#KerberosAuthentication no
#KerberosOrLocalPasswd yes
#KerberosTicketCleanup yes
#KerberosGetAFSToken no

# GSSAPI options
#GSSAPIAuthentication no
#GSSAPICleanupCredentials yes
#GSSAPIStrictAcceptorCheck yes
#GSSAPIKeyExchange no

# Set this to 'yes' to enable PAM authentication, account processing,
# and session processing. If this is enabled, PAM authentication will
# be allowed through the ChallengeResponseAuthentication and
# PasswordAuthentication. Depending on your PAM configuration,
# PAM authentication via ChallengeResponseAuthentication may bypass
# the setting of "PermitRootLogin without-password".
# If you just want the PAM account and session checks to run without
# PAM authentication, then enable this but set PasswordAuthentication
# and ChallengeResponseAuthentication to 'no'.
UsePAM yes

#AllowAgentForwarding yes
#AllowTcpForwarding yes
#GatewayPorts no
X11Forwarding yes
#X11DisplayOffset 10
#X11UseLocalhost yes
#PermitTTY yes
PrintMotd no
#PrintLastLog yes
#TCPKeepAlive yes
#PermitUserEnvironment no
#Compression delayed
#ClientAliveInterval 0
#ClientAliveCountMax 3
#UseDNS no
#PidFile /var/run/sshd.pid
#MaxStartups 10:30:100
#PermitTunnel no
#ChrootDirectory none
#VersionAddendum none

# no default banner path
#Banner none

# Allow client to pass locale environment variables
AcceptEnv LANG LC_*

# override default of no subsystems
Subsystem sftp /usr/lib/openssh/sftp-server

# Example of overriding settings on a per-user basis
#Match User anoncvs
# X11Forwarding no
# AllowTcpForwarding no
# PermitTTY no
# ForceCommand cvs server

Multisim安装(保姆级)

导言

这篇文档和软件我放在了一起,但假如你只看到了别人转给你的这篇文档的话,首先给出软件链接(和这篇文档在一块的)。以下所有需要用到的软件都在这。

<– more –>

关于Multisim的安装对我来说是一个痛苦但也有趣的回忆。于是我不得不想写下一篇markdown来记录一下,或许还可以对其他需要的人起到一些帮助作用。

关于其中涉及到的软件在各个课程群中应该都有,尤其是郑江老师(我目前也就只上过郑老师的课)的课程群中都可以找到。我只是把这些东西集合打包在一起,目前来看,可以实现正常安装并且解决所有Multisim安装的问题(包你安装成功,不可能不成功)

正片开始

Multisim简介

地球人都知道,南大电子基础实验课用的就是Multisim(万恶之源),Mulitisim是由NI(National Instrument)公司推出的用来进行电路仿真的一个玩意,因为好用,所以就来荼毒你南学子了。[/幽灵]

Multisim模电,数电实验课程都需要使用(工作量极大),但仅仅是基础课程,用来学习时使用的,后面貌似就不怎么使用了。然而除了使用,这玩意还安装起来贼能治低血压。(因为大家都说重装能解决多少多少问题,操作系统都能重装解决问题,但是这个玩意重装却能衍生问题)

以下很重要(very very and very zhongyao)

目前为止,强烈建议大家安装Mulitisim14.2教育版,其他的版本(包括专业版,就是pro版本)根本没有安装的必要(假如你是正正经经上实验课,不乱搞事,比如自己用软件研发一些东西啊,咋的咋的)。模电课程什么版本不重要,数电课程必须要教育版,只有教育版才有必须的PLD模块。并且14.2版本可以联动较新的vivado(2019)。

于 22 年暑期更新,目前 Multisim 已经更新到14.3版本了,这个版本是否能够使用 activator 进行激活尚未测试,喜欢整活的朋友可以试一下。**但就教学来看,14.2 肯定完全够用。**另外我还在官网发现了 NI 公司已经推出了院校批量许可证 ,大家觉得有必要可以考虑叫学校进行购买。(别想啦,不可能哒)

  1. 假如你对自己电脑下载软件存储比较注意的话,比如你会刻意把软件路径改到D盘而不是默认的C盘,好,那么我建议你把Multisim安装到C盘,并且是默认安装,不要去手动更改路径。原因很简单,反正你C盘也空着的,Multisim这玩意也不大,1个G都没有,放C盘就放C盘呗。
  2. 假如你是另一类型的,日常喜欢无脑安装的,导致C盘红掉并且经常很狼狈的去C盘删文件腾空间的类型。那么,很好,我建议你也把Multisim安装到C盘,并且也是默认安装。原因很简单,你本来就是喜欢这么做,谁也拦不住你啊。[/滑稽保命]

说了这么多,其实就是把Multisim放C盘,好处只有一个,可以后台调用vivado***(关于vivado的调用存在错误,应该是vivado装在C盘才可被Multisim识别调用,至于Multisim的安装位置没有强制要求,但为了省去不必要的麻烦还请按照本文档说明的来最好)可以震惊小伙伴们(哇塞!你的电脑自己就可以做数电实验了耶!)实验室电脑相对比较*差劲,用自己的电脑做比较省事,并且免去到时候要去借别人U盘拷你电脑上的仿真文件到实验室电脑上的繁琐流程了。(社恐人狂喜)

正片真的开始了

环境:Windows10系统(Windows11尚未测试)

容量:小于 1G 即可

注意:如果你是 Mac 用户,那么你很不幸,Mac 并不支持Multisim的安装,会因为 ARM 架构的原因,哪怕使用虚拟机装个 Win10 都不行。所以不建议像电子这种专业的同学使用 Mac,很多工程软件并未提供对 Mac 的接口。

  1. 假如你此前没有安装过Multisim的话,那么恭喜你荣膺**“电脑目前为止还很干净”**称号。请看这里
  2. 假如你此前安装过Multisim(不论成功与否,只要你双击过安装程序且安装程序开始进行了)的话,想要切换成教育版版本但是安装失败,或者就是安装失败,那么恭喜你荣膺**“电脑目前为止还有救”**称号。可以看那里

这里(正常状态安装)

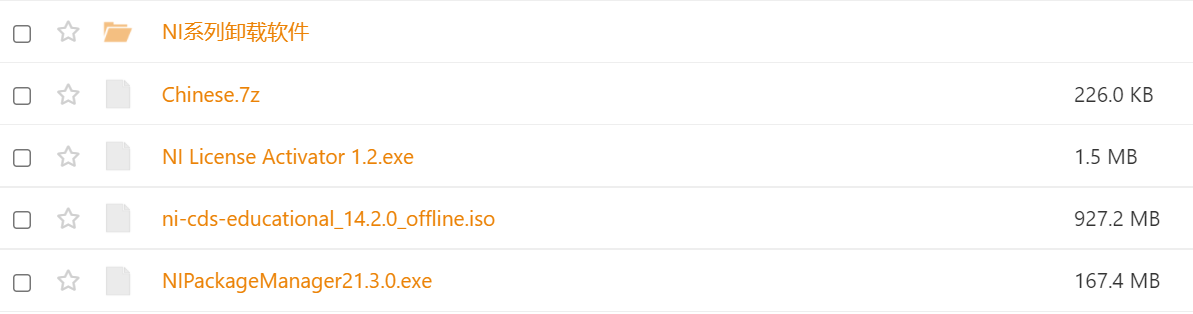
首先肯定是要下载Multisim14.2教育版啦。但这里用到的安装包,还需要另一个工具,就是NI公司的另一个产品,NI Package Manager。仅仅是这里,因为这个安装包是借助Package Manager安装的。

image-20220214203549737

  1. 首先下载安装package manager,(假如你之前就安装过电脑里就有就不用了)。就是图片最下面那个。下载后直接双击安装即可。无脑就行。
  2. 然后就可以下载Multisim14.2教育版啦,下载倒数第二个,双击点开挂载iso盘,然后双击其中名为 install 的可执行文件就可以安装了,仍然无脑,看到是啥点啥就行了。
  3. 激活(必须要激活,为供广大师生教学使用,懂得都懂),下载第三个,然后同样双击打开,选择对应的Multisim和Ultiborad版本右键激活就行了。(PS: Ultiborad 是一个已经被淘汰的东西,但还是激活好一点,凑个数)
  4. 汉化,激活后你打开发现是英文的,从小到大学了十多年的中文的我一时看到英文不适应怎么办,别急,有办法汉化。下载Chinese.7z,这是我使用7zip打包后的,下载后需要先解压,推荐使用7zip,解压后是一个文件夹,直接复制粘贴进C:\program files(x86)\National Instruments\Circuit Design Suite 14.2\stringfiles中就行了。就是放进这个stringfiles里面,默认安装的就是上面这个路径。
  5. 开始做实验。(大功告成)

那里(非正常状态安装)

由于你之前安装过Multisim,但是你不小心卸载了,或者出了问题以及想换个版本于是想卸载,这时候你卸载了,然后发现安装不上去了。那么,很好,这里可以解决你的问题。(不做绝对保证,但从经验上,我给别人都是这么完美解决的)

你卸载方式不对,你应该是使用了控制面板进行卸载,或者一些安全软件进行卸载。这些东西卸不干净,所以不能再安装上新的Multisim。

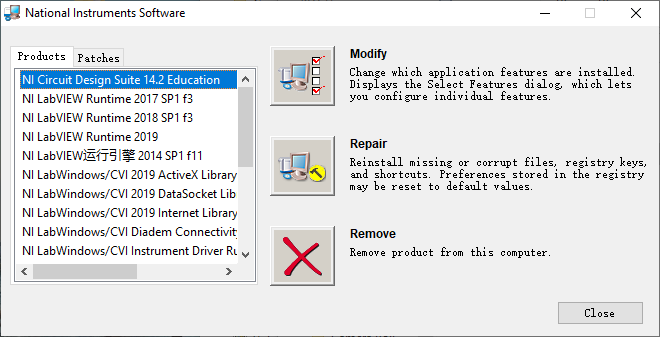
实际上NI公司很人性化,专门推出一款内部消化型程序——万能的卸载程序。就是图片中第一个,你看人家名字都叫NI系列卸载软件。他卸载的十分干净。

打开其中的uninst.exe,打开后界面如图所示。如图中,选中NI Circuit Design Suite 的版本点击remove即可。

一般都是你之前卸载不干净的版本,也正是你没卸载干净,所以这个框里显示着这个版本的Multisim还在,所以你也就安装不了其他的版本上去了。

图片名称

注意,只需要卸载NI Circuit Design Suite 就够了,其他的软件一律不要卸载啊,跟他们没关系啊(其他NI软件:你不要过来啊啊!)

现在卸载已经完成了,接下来,你的电脑又回到了第一次安装Multisim的状态,照着这里的方法来一遍就行了。

当然,假如还出错的话,这时候,出错方式应该是已经安装上了,但是打不开文件(大部分情况下应该是数电实验文件附带PLD模块),应该是labview或其驱动没有安装,再用package manager 搜索下载安装labview还有驱动就可以了。大部分情况下应该是下载Labview Runtime。有关于labview的安装,课程群里以及网上应该有很多教程可以找到。要善于搜索啊

结语

内容应该就是这么多。主要就是安装。安装出错就是因为没卸载干净,需要用专门软件进行卸载。卸载完后就可以重装了(所以重装其实是能解决问题的,只要你是真·卸载就行)

祝大家数电,模电实验Multisim使用愉快!祝大家学业进步!

如果大家还遇到什么问题,可以发邮件给我,我看到了会及时进行回复的。

假如想要我联系方式的,也可以发邮箱给我,我会回复我的QQ和微信的。

这是我的南大邮箱:[email protected]

Welcome to Hexo! This is your very first post. Check documentation for more info. If you get any problems when using Hexo, you can find the answer in troubleshooting or you can ask me on GitHub.

Quick Start

Create a new post

1
$ hexo new "My New Post"

More info: Writing

Run server

1
$ hexo server

More info: Server

Generate static files

1
$ hexo generate

More info: Generating

Deploy to remote sites

1
$ hexo deploy

More info: Deployment

here is a demo image

Latex

visual studio code

The visual studio code cannot generate the table of contents regularly. And I have searched the solution of the problem.

OK, it’s not the perfect solution, for I have now got the hang of the principle in the compiling procedure.

  1. the .aux and the .toc are the particular files that .aux is associated with bibliography while .toc is associated with table of contents. And we need to compile four times to successfully generate the PDF that we want
  2. xelatex, compiling ends with the .aux and .toc
  3. bibtex, compiling using .aux and .toc to deploy the bibliography and table of contents
  4. xelatex * 2, successfully generate the PDF(I don’t know why 2)

Moreover, for the template of njuthesis, this template uses the biblatex to deploy the bibliography. So we must use the prompt biber but not bibtex to generate bibliography.

And the biber should make the \bibliography located in preamble and add \printbibliography in the end of a chapter.

And for visual studio code, I always employ the set of xelatex-bibtex-xelatex-xelatex , so I cannot compile successfully using the njuthesis template.

On top of that, the setting of the cleaning file also matters a lot. In the settings.json in visual studio code, the latexworkshop configuration, among all the json, the latex-workshop.latex.autoClean.run, is given two options. OnBuilt and OnFailed. When the compilation has built or successfully ended, the files generated in the procedure will be cleaned. And the imperative .aux and .toc will be cleaned as well, which may cause the major problems.

At the same time, the latexmk -xelatex can also compile successfully the njuthesis when I have downloaded and installed the strawberry perl. And I also downloaded the .vscode configuration for vscode from the gitlab of NJU and I have imported it to the vs code merging the previous version. And I also added the recipe of xelatex-biber-xelatex-xelatex which also works regularly with the template.

TexStudio

TexStudio is also a popular major Tex Editor, which has the equal position with vscode in the industry. And you can choose which to use depending on your emotion habit and preference.

In TexStudio, you are allowed to modify the configuration in the option as you please. The first thing you should do shall be modifying the default annoying engine. The default compiling engine the pdflatex, which is not so friendly to most of us normal students in China. In the most time xelatex is needed to employ rather than the pdflatex which may result in errors.

SumatraPDF

SumatraPDF is an excellent PDF reader with lightweight features, which is a better option than Adobe Acrobat if you just read the PDF not modify or do other things.

What makes me like SumatraPDF is actually that both TexStudio and vscode are able to open an executable file which is a PDF reader when you click the view the PDF. At the time, SumatraPDF stands out with its lightweight. Because of that, we can open the PDF quickly and efficiently.

About the issue that how to set the SumatraPDF be the default external PDF reader in the vscode or TexStudio, there are too many tutorials in the web. Just search and deploy.

Syntax

Space in filename

As for the bibliography, if you employ the bibtex, it is forbidden to make the filename attached space, while you employ the biblatex it is not so restricted, you can use \addbibliography which can only add one bib file once used.

change ref name

  1. To change the ref name in the end of file, it is an available way to redefine the \refname . The code is \renewcommand\refname{the new name} in the preamble.
  2. Using the cleveref package. \crefname{figure}{图}{图}, The last two parameters are the names used for the figure notes and references respectively.

new float

The float is always a whole box that occupy some space. And it will be a problem if the box is too long or large to completely display in a page. So it should employ the new float characteristic. In the minted package, you can use the newfloat argument to do this. And what is the most suitable solution is using the lstlistings and new an environment to do that.

1
2
3
4
5
6
7
8
9
10
\usepackage{lstlistings}
\usepackage[newfloat]{minted}

\newenvironment{longlisting}{\captionsetujp{tyhpe=listing}}

\begin{document}
\begin{longlisting}
very very long in the vertical aspect code block...
\end{longlisting}
\end{document}

breaklines

The same as new float, if the inline code or code block is too long in the horizontal aspect, you can use the breaklines to avoid this. for the minted, you can use breaklines argument in the prenium. Also useful with mintiline.

Arguments

There are many optional arguments for the compiling engine to compile the destination file. And for the minted package, the --shell-escape is necessary. And why the argument comes about the answer in stackexchange. It means that the minted package is a file external which will be regarded as not secure for the major file to be compiled causing the interrupt of the compilation.

Package

minted

Package minted can be employed to make the code highlight, which can render the code block not so boring and become very cool. And here are the example of the implementation of the package.

1
2
3
4
5
6
7
8
9
10
11
12
13
14
15
16
17
18
19
20
21
22
23
\usepackage{minted}
\usepackage{xcolor}
\definecolor{LightGray}{gray}{1}
\begin{document}
\begin{minted}
[
frame=lines,
framesep=5mm,
baselinestretch=1.2,
bgcolor=LightGray,
fontsize=\footnotesize,
linenos
]{matlab}
x = 100;
y = 100;
z = 'hello world!';
if x == y
disp(z);
else
disp(x);
end
\end{minted}
\end{document}

This is a code block whose the language is matlab. And you can compile the tex file and get the result that is very beautiful a pdf file.

Attention, minted package must be invoked by –shell-escaped prompt, which means if you compile it in the powershell or cmd you have to use the prompt xelatex --shell-escaped main.tex . And you should config the compile option when using the minted. However, in my vscode, I have config it in the settings.json. I am so clever a man/boy.

fontspec

This package is almost used to change the font of text.

ctex

The author not only provides a documentclass but also compress it into a package. ctexart and the ctex is the same in a term.

In its manual, there are many wonderful function we can use, such as changing the section settings like internal, font and size. And the useful one is space=true

And the most useful is the \ctexset={} , in the curly bracket, we can custom our wanted setting

biblatex

The hyperref package transforms citations into hyperlinks. See the hyperref and backref package options in § 3.1.2.1 for further details. When using the hyperref package, it is preferable to load it after biblatex.

latexmk

After the struggle with the minted package, I feel so tired and think of that I am so weak to get the hang of latex. It’s so difficult, so difficult……And now I have come to some conclusions. As for latexmk, it is an tool that very strong and powerful which can make the compilation realized by one time while other tools cannot do that when the file attached with bib, toc and so on. On top of that, there are also a file named latexmkrc or .latexmkrc. Inside the file are is the detailed configuration info about the compiling engines. And if it is in the overleaf, it is very necessary to config a latexmkrc file. Just like the minted package that needs the –shell-escape, in the local IDE we can get the arguments to be treated properly while in the overleaf we can’t, so we need to get the work done with the help of latexmkrc and .latexmkrc.

What is the most useful command prompt is as follows

1
latexmk -xelatex -shell-escape && latexmk -c

This command can detect the compiling engine that is needed and the repeat time as well as the compiling sequence automatically. Very useful! Strongly recommend!

tabularx

It can be used to specify the width of the tabular environment

1
2
3
4
5
6
\begin{table}
\centering
\begin{tabularx}{\textwidth}{|c|c|c|}
...
\end{tabularx}
\end{table}

tabularray

1
2
3
4
5
6
7
8
9
10
11
12
13
14
15
16
17
\documentclass{article}
\usepackage{xcolor}
\usepackage{tabularray}
\begin{document}
\begin{tblr}
{
colspec={Q[c,m]Q[c,m]Q[c,m]},
hlines,vlines,
row{1}={bg=gray8},
}
$p$ & $q$ & $p\land q$ \\
T & T & T \\
T & F & F \\
F & T & F \\
F & F & F
\end{tblr}
\end{document}

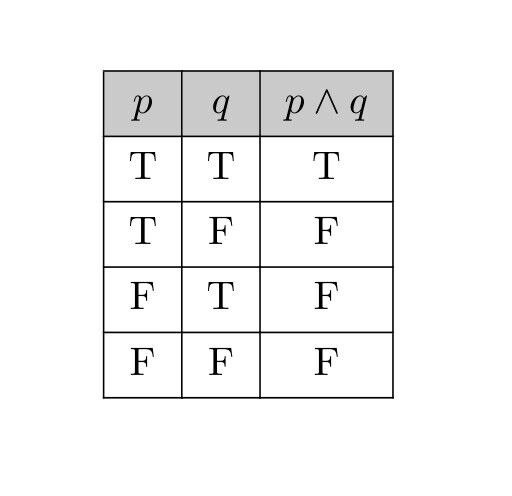
The result is as follows:

tabular.jpg

Three-line meter

1
2
3
4
5
6
7
8
9
10
11
12
13
14
15
16
17
18
19
20
21
\usepackage{booktabs} % preamble

\begin{table}[H]
\belowrulesep=0pt
\aboverulesep=0pt
\centering%把表居中
\begin{tabular}{c|ccc}%四个c代表该表一共四列,内容全部居中
\toprule%第一道横线
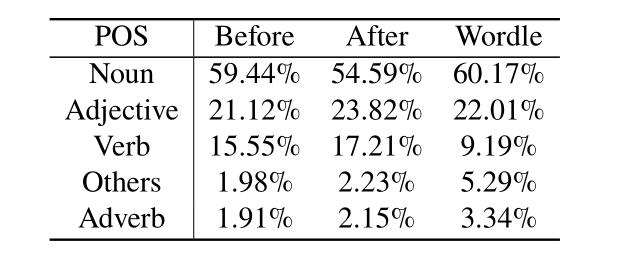
POS & Before & After & Wordle\\

\midrule%第二道横线
Noun & 59.44\% & 54.59\% & 60.17\% \\
Adjective & 21.12\% & 23.82\% & 22.01\%\\
Verb & 15.55\% & 17.21\% & 9.19\% \\
Others & 1.98\% & 2.23\% & 5.29\% \\
Adverb & 1.91\% & 2.15\% & 3.34\% \\
\bottomrule%第三道横线
\end{tabular}
\caption{\textbf{Percentage before and after deletion of database and in Wordle}}%标题
\label{tab:before vs. after}
\end{table}

image-20230303015033832

Tree directory diagram

1
2
3
4
5
6
7
8
9
10
11
12
13
14
15
16
17
18
19
20
21
22
23
24
25
26
27
28
29
30
31
32
33
34
35
36
37
38
39
40
41
42
43
44
45
46
\begin{figure}[h!]
\centering
\begin{tikzpicture}[%
grow via three points={one child at (0.5,-0.7) and
two children at (0.5,-0.7) and (0.5,-1.4)},
edge from parent path={(\tikzparentnode.south) |- (\tikzchildnode.west)}]
\node {CNNdetection}
child { node {demo\_test.py}}
child { node {demo\_dir.py}}
child { node {widget.py}}
child { node {train.py}}
child { node {validate.py}}
child { node [selected] {dataset}
child { node {train}
child{ node {0\_real}}
child {node {1\_fake}}
}
child [missing] {}
child [missing] {}
child { node [optional] {val}
child{ node {0\_real}}
child {node {1\_fake}}
}
child [missing] {}
child [missing] {}
child { node {test}
child{ node {0\_real}}
child {node {1\_fake}}
}
}
child [missing] {}
child [missing] {}
child [missing] {}
child [missing] {}
child [missing] {}
child [missing] {}
child [missing] {}
child [missing] {}
child [missing] {}
child { node {examples/}}
child { node {checkpoints/}}
child { node {weights/}};
\end{tikzpicture}
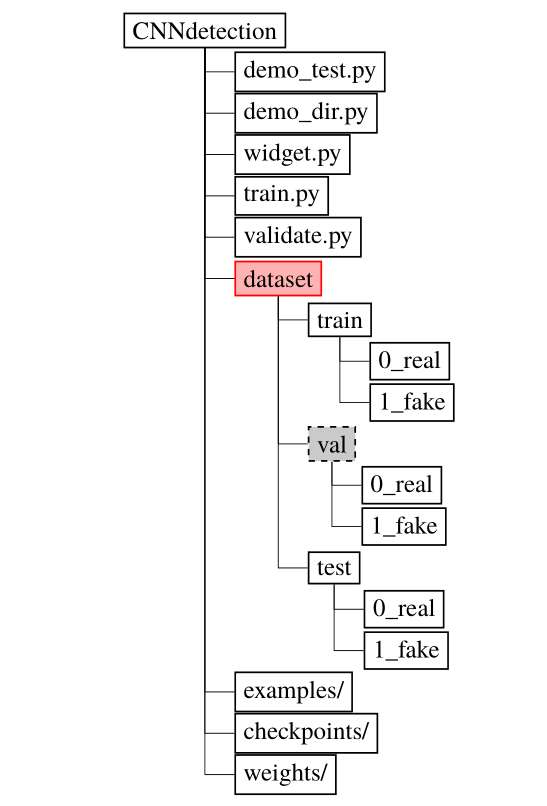
\caption{文件树状图}
\label[figure]{fig:文件树状图}
\end{figure}

image-20230303020910671

macros

minted

I want to use the macro to replace the complex environment with many optional parameters. But it is not easy to realize in the minted because of it’s nature.(very special and make the \newenvironment cannot work properly)

It should be that using the \newenvironment to make a new environment defined by myself.

In terms of minted, in its documentation, there is the interpretation about the alias for specific language settings. We should use the \setminted or \newminted to make it done. On top of that, to make \newenvironment into use, it should include the fancyvrb package. And in the {before}, the \VerbatimEnvironment must be placed in front of the \begin{thecode}. Here is the tex code.

1
2
3
4
5
6
7
8
9
10
11
12
13
14
15
16
17
18
19
20
21
\usepackage{fancyvrb}

\setminted[shell]{
frame=lines,
framesep=5mm,
baselinestretch=1.2,
bgcolor=LightGray,
fontsize=\footnotesize,
linenos
}

\newminted[linux]{shell}{
frame=lines,
framesep=5mm,
baselinestretch=1.2,
bgcolor=LightGray,
fontsize=\footnotesize,
linenos
}

\newenvironment{myminted}{\VerbatimEnvironment\begin{linux}}{\end{linux}}

color

1
2
3
4
5
6
\textcolor{name}{...}
\textcolor[color model]{color specification}{...}
or

\color{name}
\color[color model]{specification}

\textcolor{name}{...} can color the content in the curly bracket while \color{name} can color the environment within. {\color{red} ....} or \begin{table}\color{blue} \end{table}

And \definecolor{name}{model}{color specification} is often used to define a new color. the general model are rgb RGB cmyk gray.

box

\mbox and \makebox can make a box

\fbox and \framebox can make a box with four lines(frame)

\colorbox{name}{...} can make a box with a background in name while \fcolorbox plus a frame on the base.
Tikz